 |
How CA evades a barrier
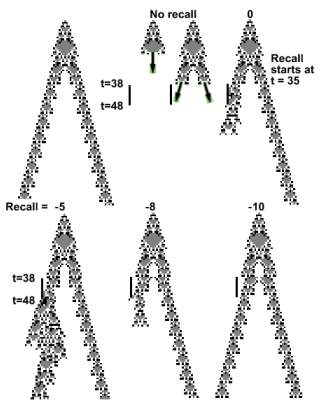
We continue exploring the wisdom of a two
tailed reference CA depicted at the upper left corner. At t = 38 a barrier
is placed at location x = 38 (Compare with previous
barrier experiments: Chapters 2, 3,
and 31). The barrier remains at location x =38 until t = 48, and is removed at t = 49. At location x
= 50, we plant a zygote ( t = 0 ). As CA grows it becomes wider and approaches
the barrier. At t = 35 it pauses.
In order to evade the barrier, it starts recollecting its previous
experience. Without recall (= 0) it touches the barrier
and its left tail is short.
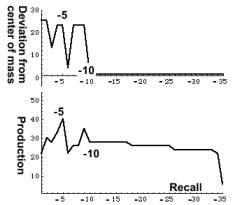
At recall = -5 it interacts heavily with the barrier. At recall =
-8 it barely touches the barrier but the tail remains short. Finally recall
= -10 evades the barrier. The CA strategy is to elongate its narrow body and grow its tail somewhat
later than the reference CA.
 |
 |
Setup
barriertime = 38; barrierendtime = 48; statetime= 35; prevstate =
*; agetime = 35; prevage = *; preva[[1,*]]
= a[[1,*]]; prevage[[1,*]]
= age[[1,*]]; effect[1, 1, 25];